
Improvised Instruments – The Science of Sound: Schools’ Projects
This resource is designed to help you and your class use music to explore the Sound topic in the National Curriculum Science programme of study for Year 4.
In this project we invite you to use musical instruments to identify key practical components of the Sound topic and also introduce your children to orchestral instruments and the way they work, ending by coming together as a class to make your own home-made orchestra!
We have provided an outline of this project, and some supporting material. Please feel free to adapt the ideas below to suit the resources you have and the needs of your children.
These resources are © copyright Rosamond Savournin, London 2019 (see About the Author section at the bottom of the article for more information).
The aims of this project are:
- To deliver the content of the Sound topic in the National Curriculum Science programme of study
- To broaden pupils’ knowledge of orchestral instruments, how they work and how they come together to form an orchestra in different sections
- To develop a range of ongoing musical skills through singing, rhythm work, and performing together in an ensemble
Although there is flexibility around this project, dependent on the resources available to you at school, the idea is that it should include the following elements:
- Practical demonstrations of sound as a vibration
- A carousel activity where children investigate how different instruments work
- An introduction to orchestral instruments and how they work using videos of players from the London Philharmonic Orchestra, along with craft projects for making home-made versions of these instruments
- Musical activities that bring the class together as a home-made orchestra
There are five sections to this project:
Part 1 – What is sound?
Part 2 – Learn a song
Part 3 – How do musical instruments make sound?
Part 4 – How do orchestral instruments work?
Part 5 – Bringing it all together
Part 1 – What is sound?
Introduce your pupils to the concept of sound as vibration and how it travels using some of these practical activities.
Resources needed:
- Confetti, torn-up tissue paper or rice
- Large drum
- Tuning fork
- Bowl of water
- Stringed instrument (e.g. guitar, ukulele, violin)
- Large cymbal or triangle
- Slinky
Sound is a vibration. Vibration means moving (or wobbling) very quickly back and forth. When something makes a sound, it vibrates, which makes the air around it vibrate. To visually demonstrate the vibration you might:
- Show the children a large drum (maybe a large djembe) and ask them how it works. Which part do you hit to make a sound? What happens when you hit it? Sprinkle the drum head with confetti, or torn-up tissue-paper, or rice. Now hit the drum again and see how the confetti flies into the air because of the vibration of the drum head.
- If you happen to have a tuning fork, make it ring and then place it into a bowl of water – it should cause the water to ripple or even splash if the vibration is strong enough. There are many videos of this effect online (it’s particularly effective in slow motion).
- Show the children any stringed instrument e.g. guitar, ukulele, violin. Pluck a string and then discuss what you see. The vibration is clearly visible – the string becomes blurred as it makes a sound.
- Vibration can be felt on resonant metal – a cymbal or large triangle is good for this activity. Play a single long sound and ask the children how you can make the sound stop. The answer is to touch or hold the instrument, which causes the vibration to stop. Most children will know this but won’t have thought about why. Let different children have a go and ask what they feel. As you stop the instrument sounding, there is a short ‘buzz’ feeling which is the vibration transmitting to your hand.
Sound travels through the air to our ears, where our ear drum picks up the vibration. Particles of air vibrate, and make the particles around them vibrate and that gets passed on.
- You can visualise this using a slinky. Stretch it out into a long straight line. Do a sharp push at one end and watch the compression wave travel quickly down from one end to the other. It looks like something travelling all the way down, but it isn’t – the movement in each individual part of the spring creates that effect.
The vibrations travel in all directions, and get weaker the further the sound travels – so if you’re far enough away, you can’t hear the sound. Louder sounds make bigger vibrations which travel further.
- Take an instrument that sounds for a long time after you’ve struck it – a large triangle, a resonant chime bar, or a cymbal with beater work well for this activity. Spread out if you can (this works well in a hall) and ask everyone to shut their eyes. Make a single, reverberating sound (the longer the better) and ask children to listen really carefully to the sound, right up until the end. Now do it again, and this time ask them to put their hands on their heads when they can’t hear the sound any more. If they’re listening carefully, you will see an effect of distance, so children nearest to the sound hear it for the longest. Vary the volume to vary the effect.
Part 2 – Learn a song (this is a music project after all!)
Use the song Riding that new river train to make some organised sound using our voices and instruments.
Resources needed:
- Handheld percussion (drums and shakers)
- Playlist

This American folk song is thought to originate in the 1880s and to be associated with the railroad lines in the New River area of south-western Virginia. You’ll find many performances online (but please note, the above verses have been added for this project; the original song has different and slightly less primary-appropriate verses!).
1. Start by learning the melody. The music is above, or you can listen to track 1 on the playlist.
2. Now learn some simple body percussion with words.

3. Do the clickety clack part, patting knees at the same time (track 2), then stop using the words and just do the knee pat.
4. Now try the ch-k-ch-k-ch part (track 3), patting the chest with your left and right hands at the same time. Then drop the chest pat and just say the words. Remember you can hear examples of how to do this in the playlist above.
5. Now combine the class into two groups and do both patterns at the same time (track 4). You can transfer these patterns onto percussion now: drums for clickety clack and shakers for ch-k-ch-k-ch.
6. Once your children know the song well, divide your class into groups and see if you can combine singing with instruments. Tracks 5, 6 and 7 on the playlist include a full version, and two different backing tracks for you to perform along with.
If you want to take your performance further, why not try using the playlist above and this sheet music:
'Riding That New River Train' Sheet Music

Part 3 – How do musical instruments make a sound?
Children investigate how different musical instruments work and put them into categories.
Resources needed:
- 6-8 tables set up around the room
- A mixture of classroom instruments and pictures of other instruments (see downloadable file below)
- Question cards (see downloadable file below)
1. Set up 6-8 tables around the room with different musical instruments. Adjust the categories to suit what you have in school. You might also use a combination of real instruments and pictures.
Here are some suggested tables (but don’t label them for the activity):
- String instruments: e.g. guitar, ukulele, bass guitar, autoharp (there’s a surprising number of dusty old autoharps in school music cupboards…), violin and bow (or other bowed instrument)
- Wind instruments you blow into: e.g. recorders (of different sizes if possible), swannee whistle, train whistle, ocarina
- Wind instruments you blow across: e.g. flute or fife, pan pipes, a couple of glass bottles with differing amounts of water in them
- Reed or brass instruments: e.g. clarinet, oboe, trumpet, trombone. If you’re lucky enough to have these instruments in school, you could separate woodwind (reeds) and brass (mouthpieces)
- Drums: e.g. ideally drums of different sizes and shapes;
- Tuned percussion: e.g. chime bars of different sizes, xylophone, metallophone, glockenspiel, boomwackers of different sizes, hand chimes
- Untuned percussion: e.g. shakers (ideally with varying timbres or ways of working), claves, guiro, tambourine, wood block, triangle, agogo bell
2. Make sure the children know the difference between loud/quiet and high/low, perhaps you could demonstrate this by using your voice (but don’t explain any of the science behind this yet!)
3. Display the following questions for groups to answer at each table (or put a question card on each table if you want to customise the questions to suit the instruments you have). Then divide your children into groups and allow them to spend some time at each table.
- Can you name any of these instruments?
- What do these instruments have in common?
- What are the differences between them?
- Can you make a sound?
- How do you make a higher sound? A lower sound? A louder sound? A quieter sound?
- What is vibrating to make the sound?
4. Come back together and gather some initial thoughts from the class.
What is vibrating to make the sound?
This question will lead you naturally to categories of instruments. You may be familiar with the orchestral families (strings, woodwind, brass and percussion) and we’ll come back to these later. For this exercise, a more scientific classification is useful.
5. Explain the Hornbostel-Sachs classification method. This system was invented by ethnomusicologists Erich Moritz von Hornbostel and Curt Sachs in the early 20th century when they were looking for a way of categorising instruments from around the world. They use four categories according to what is vibrating to produce the sound.

Hornbostel-Sachs classification of instruments
In order to produce the sound….
Aerophones – air is vibrating
Chordophones – a stretched string is vibrating
Membranophones – a stretched skin is vibrating
Idiophones – the whole body of the instruments itself is vibrating
Introduce these words and your pupils will know more than most adults! But they are really useful categories because they are not as confusing as the orchestral groups, and relate directly to the science of how instruments work.
6. In your plenary, put all the instruments that the children have investigated into one of these categories. Now add any other instruments you can think of.
7. Ask the children how they would make a louder sound on these instruments. Answers are: blow harder, pluck/bow harder, hit it harder, shake it harder. You can then explain that it’s all about the force with which you play the instrument, which makes larger vibrations.
Ask the children how they would make a higher sound on these instruments. This is a bit trickier than the previous question, but it’s clear that size is involved. Smaller drums, chime bars, recorders, wood blocks etc. make higher sounds than their bigger counterparts. A ukulele is higher than a guitar, a violin is higher than a cello. Here’s how it works with each of the Hornbostel-Sachs categories:
- Aerophones – usually create a column of air to vibrate. The shorter or smaller this column is, the higher the sound.
- Chordophones – make a higher sound by shortening the string.
- Membranophones – make a higher sound with a smaller drum head.
- Idiophones – make a higher sound by having a smaller body to vibrate – so we have the different sizes of bars on tuned percussion, or the different lengths of boomwhackers. With untuned percussion, a two-tone woodblock or an agogo bell demonstrate this brilliantly.
The reason for this is the frequency of the sound wave (the frequency of a wave is the number of waves produced by a source each second). A smaller space to vibrate means quicker vibrations – vibrations at a higher frequency – and this creates a higher sound.
Nearly there… there’s just one more bit of science to explain high and low. Some of your children will spot that you can also change the pitch on a chordophone by tightening or loosening the string. That’s because this also affects the frequency of the sound wave. A tighter string has less available movement – so the vibrations are quicker, which sound higher. You can also adjust the tension on some membranophones – drums which have screws to tighten or loosen the drum head – and a tighter head means a higher sound.
Resources for Part 3 - How do musical instruments make a sound?


Part 4 – How do orchestral instruments work?
The instruments in a modern orchestra are the result of centuries of design and refinement, but they use the same basic principles we’ve been learning about. In this part of our project, we’ve included some videos from LPO players explaining their instruments. For each category, there are some suggestions of craft activities to make your own instruments. You might decide to do some of these in class, or to set a homework project (or a combination of the two). The internet is full of brilliant ideas for this kind of activity, so it makes a really good half-term homework project. It’s also possible to use recycled/repurposed materials for just about everything you make.
Resources needed:
- Playlist of instrument demonstrations from the London Philharmonic Orchestra
- Craft materials for home-made instrument activities.
Instrument Demonstrations by players from the LPO

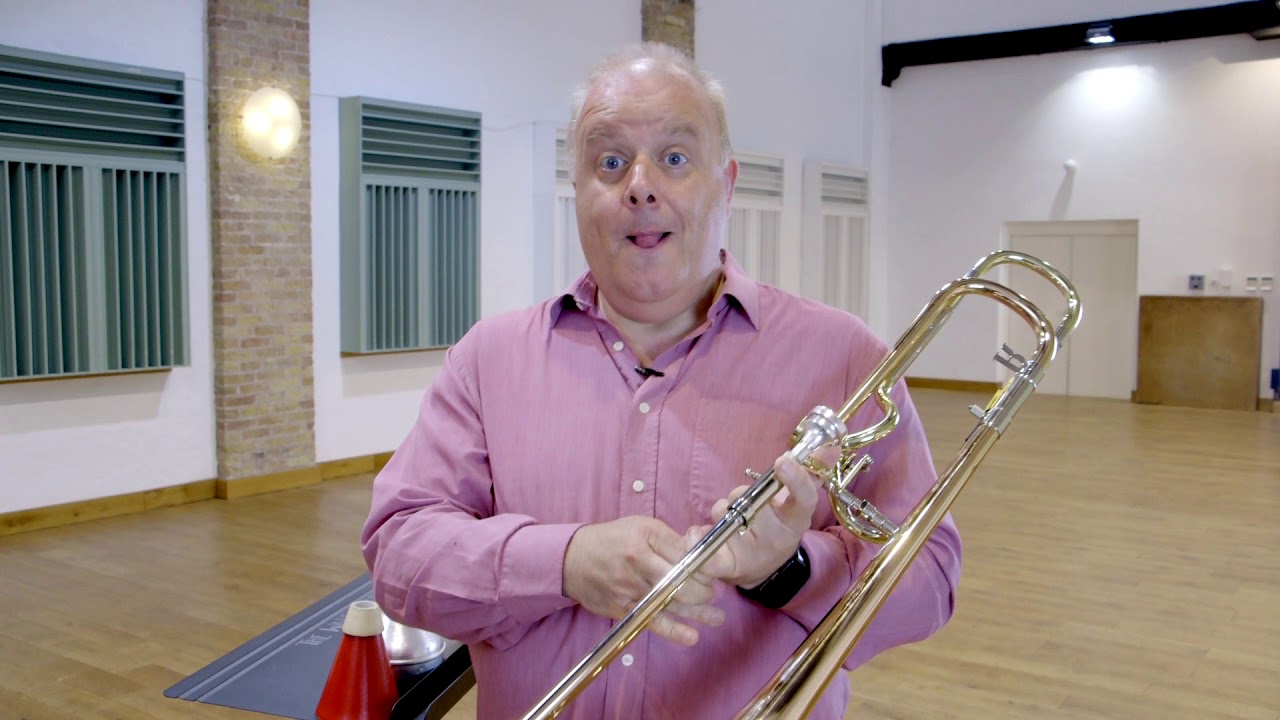
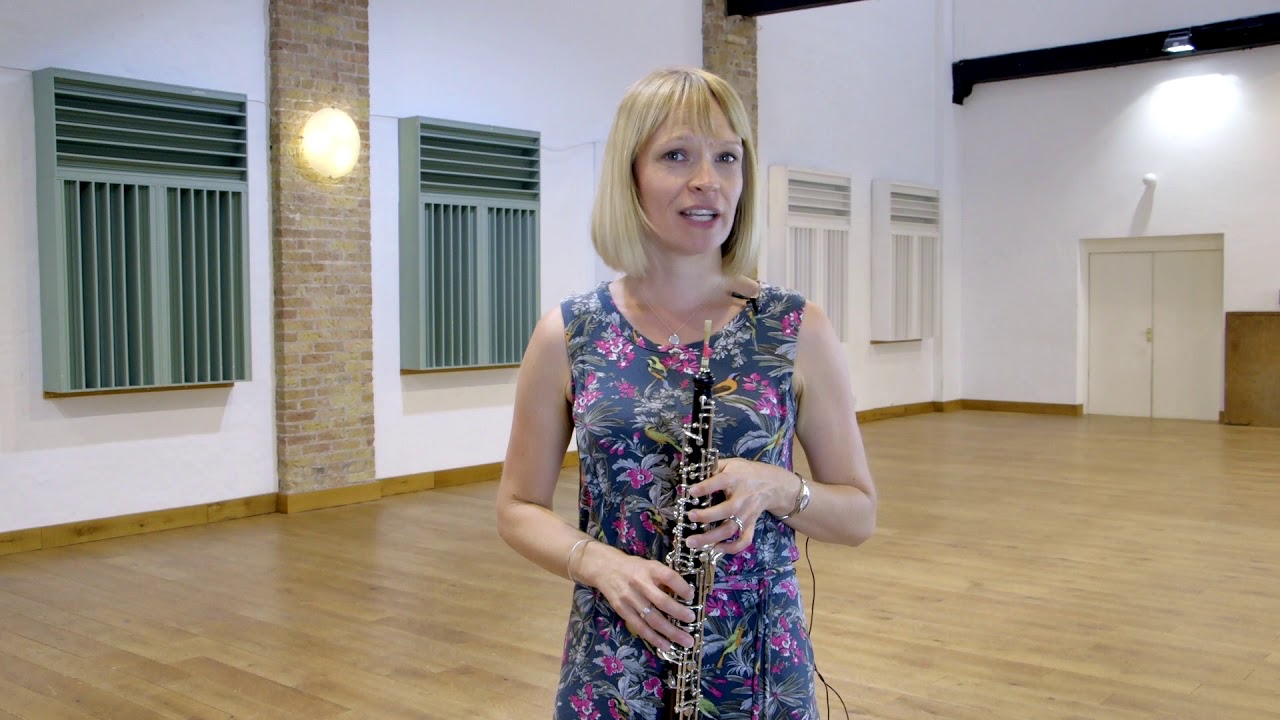
Trombone and Oboe
Watch the Trombone and Oboe demonstrations in the playlist above. These instruments are both examples of aerophones – but they come from two different sections of the orchestra – brass and woodwind.
Making your own aerophone: a straw oboe

If you have some plastic straws you want to put to good use, you can recycle them as improvised double reeds. Flatten one end of the straw and then snip off a narrow diagonal from each side, extending about 2cm down the straw, so that the flattened end is shaped like a thin triangle. (If you’re not sure how to do this, there are loads of videos online).
Put your lips over your teeth, put the snipped end of the straw between your lips so that the triangle is inside your mouth, squeeze gently and blow. If you get the formation of the lips and the pressure just right (players call this the embouchure) then you will get a loud squeak. It’s tricky at first and you will start with lots of children going red in the face as they fail to make a sound! Don’t squeeze too hard. Once you’ve succeeded, it becomes much easier to replicate.
Alice, whom you saw in the oboe video, makes her own reeds too – but not out of plastic straws! You can ask your children to find out what oboe reeds are made of.
Other aerophones you can make: improvised pan-pipes, tuned water bottles. If you have a brass mouthpiece and can make a noise with it, then there is fun to be had with garden hose (or another kind of tubing) and a funnel… but it’s quite tricky to play!
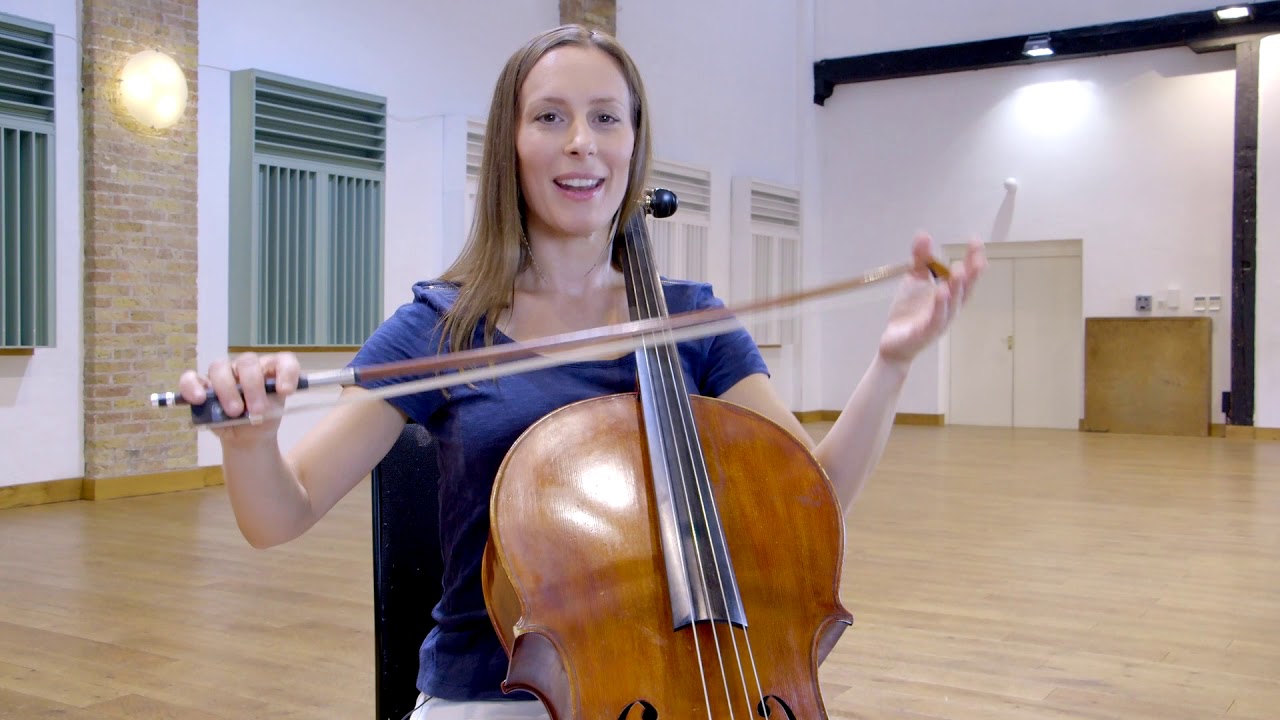
Cello
Watch the cello demonstration on the playlist above. The cello is a chordophone – in the orchestra these are the instruments of the string family.
Making your own chordophone: a skiffle bass
For this you need a washing up bowl or large bucket with a rim (a plastic one will work, but the more solid the better), some string and a wooden broom handle with, ideally, a hole in one end and a notch in the other (you can improvise with duct tape, but it doesn’t work as well).
- Make a small hole (a pair of compasses will do this) in the base of the bowl.
- With the bowl upside-down, cut a long length of string (person height), knot it and pass it upwards through the hole.
- Now take the broom handle and stand it upright with the notched end on the rim of the bowl.
- Pass the other end of the string through the hole in the broom handle and secure it by tying it around, so that the string is pulled fairly tight with the pole upright.
- Secure the bowl on the floor with your foot and twang the string to play. Vary the pitch by pulling the broom handle forward and back to vary the tension.
- If you’re prepared to use some tools and buy better bits and pieces, there are instructions for high class versions of this instrument to be found online – they really do work well.
Other chordophones you can make: use rubber bands and a reinforced box (the stronger it is, the better it will work) to make improvised guitars or harps.
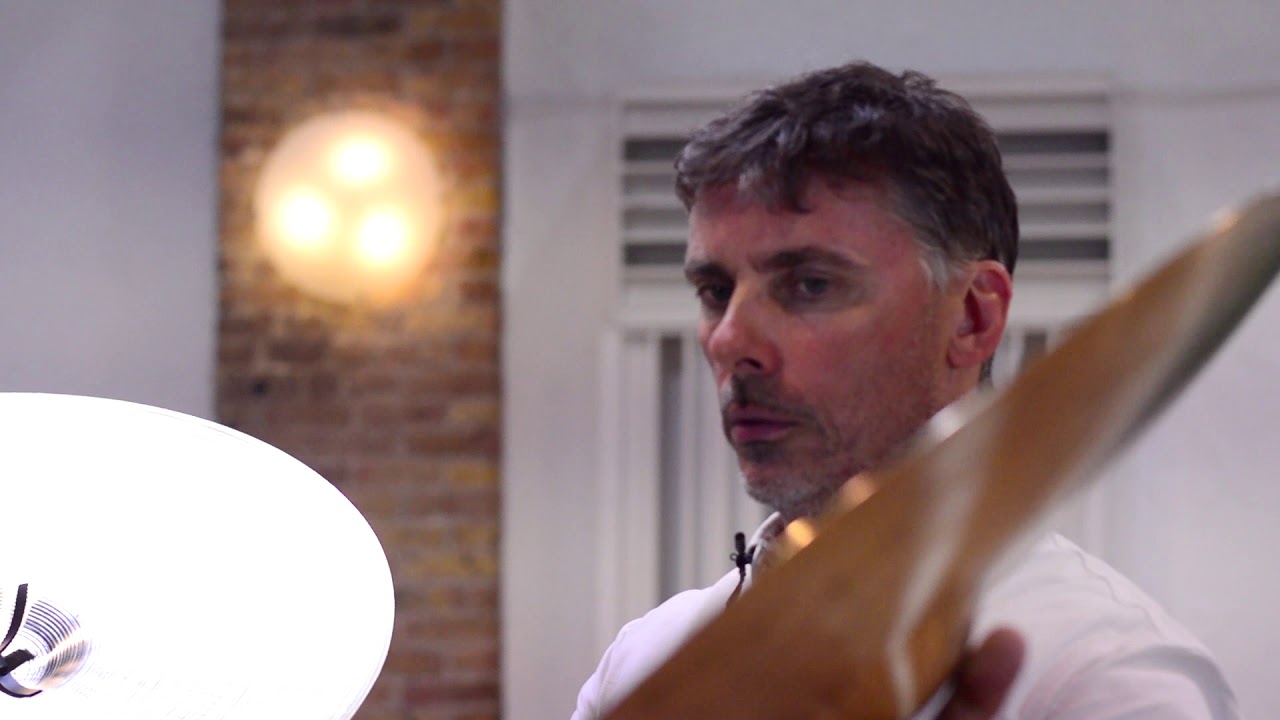
Percussion
Watch the percussion demonstration in the playlist above. In this video you see membranophones and idiophones, but they are all from the same section of the orchestra – percussion.
Make your own membranophone: a balloon drum
For this you need a balloon, a plastic cup or bowl (or a tin can or anything else suitably solid) and an elastic band. Simply stretch the balloon over the rim of the bowl and secure with the rubber band. The bigger the area of the stretched head, the lower the sound.
Make your own idiophone: a shaker
This is the easiest possible project and so much variety of sound is available if you vary the materials you use. Take a bottle or a jar and fill it with rice – or beads, or pasta, or lentils, or gravel…. the possibilities are endless. Then secure the lid and away you go.
Other idiophones you can make: well, you can hit pretty much anything hollow with a wooden spoon! Try plant pots of different sizes to make an improvised xylophone. Or make some sand blocks with recycled polystyrene packing and sand paper.
Bonus membranophone activity – Tap along timpani
In the first movement of his fantastic piece Sinfonietta, Czech composer Leoš Janáček (pronounced “Ya-na-check”) makes the timpani have a conversation with the brass section in a thrilling fanfare.
Learn this rhythm. As you say it, pat your knees alternating right and left, starting with the right as shown.

Now watch the video and tap along with the timpani! This is tricky at times but lots of fun and the music really is brilliant. The rhythm keeps repeating, sometimes once, sometimes in pairs, sometimes in different parts of the bar, and it gets quite fast in the middle, but it’s the only pattern the timpani play until… when? Can you hear when it comes back? How many times does it happen at the end?
There are other LPO tap along videos you can look at on the LPO’s YouTube channel. They are a powerful introduction to following a musical score. They make a great few minutes of fun at the end of a lesson.
Invent your own instrument
You could invite your children to design their own, brand new, instruments, using the Hornbostel-Sachs categories. They could be make-able in class, or wildly imaginative! We would love to see your designs.
Design Your Own Instruments: Worksheet
Part 5 – Bringing it all together
The culmination of this project is to make a class orchestra out of home-made instruments.
1. Once everyone has their own home-made instrument, sort yourselves into sections – woodwind/brass, strings, percussion. Depending on what instruments you have, you might then subdivide groups further, e.g. put your shakers together, or your straw oboes. Can we organise ourselves like an orchestra? Have a look at how a modern orchestra is laid out. Can we make up our own layout to suit the instruments we have?

2. Sing the song! Try featuring your wind instruments for the train whistle, and your lowest instruments for the rumbling tracks.
3. Now there’s only one more thing we need to make this like the LPO, and that’s a conductor! Let different children try this out. What gestures will you use to start and stop the orchestra? How will you keep them in time?
Maybe you can lead the orchestra in an effect – for example your train can start off in the distance and get closer and closer, then at the end of the song disappear into the distance again. Discuss how you can tell the orchestra to play quieter or louder using gestures. Or perhaps your train can start at a standstill and gradually accelerate.
Sharing your work
We would love to see or hear your performances and pictures of your home-made instruments. If you would like us to share any of your work, you can send in any audio, images or video to [email protected] (please send any large files via wetransfer or other filesharing service rather than direct email).
About the author
Rosamond Savournin started out as a half-hearted psychologist, became a rather more enthusiastic pianist and then finally found her forte (via all sorts of schools, and lots of community music projects, theatre companies and choirs) getting people to sing and make music together. She currently works as a musical director, arranger, teacher, consultant and occasional performer, conducts several youth and adult choirs, and writes music education projects making orchestral and operatic repertoire more accessible to young people.